Thursday, June 13, 2013

Make a New TV Stand!


With an 8 month old now cruising around our floors, our former tv stand that was no more than open shelves weren't going to cut it. I found the original dresser on craigslist listed for the incredible price of FREE! With paint and the new handles, I spent $12 for this new tv stand!

Instructions:
  • The first thing I had to do was fit a shelf on the inside of the top drawer. I made both the sides and floor of the shelf flush with the outer walls of the drawer space and mounted them with brackets. I also  cut out a hole in the back panel with a jigsaw for the wires.
  • Next came painting. I took off the old drawer handles and put on 3 layers of the black spray paint. (I didn't spray paint the back to save on the paint cost) I had some leftover blue paint from my baby's changing table and did the inside of the shelving and the side of the drawers (not pictured) for an accent!
  • Finally replace the drawer handles, add carpet pads to the posts so it won't scratch the hardwood and  it was done! The entire project took 5 hours, most went into planning the shelving piece sizes and letting the paint dry.

Thursday, April 11, 2013

Make Ice Jelly Beans!

We saw this idea on Pinterest and we wanted to try it as decorations for the Christmas Party at my in-laws! 


Directions: Get ballons. Add a few drops of food coloring in FIRST then fill with water. Put outside to freeze! We left them overnight and flipped them in the morning. if they're in the snow and you don't flip them, the half in the snow will not freeze! Cut off the balloon and place where you want them!

Construction Time: 5 minutes + freeze time of your choosing
Construction Cost: $0.50 for balloons and food coloring


Monday, April 8, 2013

Make My Sister a Clock!

I saw a clock like this on Pinterest and wanted to make it for my sister and brother-in-law for Christmas!


Directions:
  • Find a piece of wood or thick cardboard. (I used .25" thick wood) 
  • Get a clock. You can pull the hands of the clock mechanism off so you only have the back piece.
  • Drill a hole in the center of the wood so the clock mechanism can fit through with a small amount of space. You don't want this to be a tight fit so it can turn freely.
  • The clock mechanism needs housing. Get some extra small piece of wood and nail or glue the pieces on the back so the mechanism stays put! You'll also need to add on a mounting bracket.
  • Paint the front of the wood. Let it dry.
  • Paint the numbers falling into the corner of the board and the phrase "whatever, I'm late anyways." on the face. (Yes, I realize the grammar is not entirely correct...) Let that dry.
  • Assemble the clock hands and it's complete!
It was a nice project. Definite Santa's workshop project!

Construction time: 3 hours
Construction cost: $2 for a clock from Goodwill that I took apart. The rest were leftovers from other projects!

Thursday, April 4, 2013

Make Crayon Art!

I kept seeing those melted crayon art things all over Pinterest! You know, the awesome ones where they dripped from the crayons. Then there started to be variations of those; the heart shaped ones and the ones with words on them. But the coolest ones, in my opinion, were the ones where they pushed the color allll over with a hairdryer to be more like tye dye! So I tried it!


It turned out so artsy and fancy and I Love it! 

Directions are simple: tape a few pieces of crayon to a canvas board or whatever you want really and hair dryer that thing all over! It the tape comes free, be careful! The crayon piece can shoot right onto your carpet and that is a PAIN to get out! If you want to smooth it out or add texture, use your finger or an eraser or something to smear it.

Construction time: 15 minutes
Construction cost: $1 for the canvas board from a pack!

Make my baby a Halloween Costume!

What would my 1 month old be for his first Halloween? A FOOTBALL! That way, Daddy and I could be football players!


Instructions:
  • Gather a onesie, some spare fleece, fabric dye, and needle and thread. 
  • Dye the onesie! Follow the directions included with dye. I did it in our sink.. it's a good idea to wash it before continuing to the assembly!
  • Cut out the laces shape on the fleece
  • Sew on the laces! It isn't hard to hand stitch it, though a machine would work too!
Dress up your baby and enjoy! 

Construction time: 3 hours
Construction cost: around $8


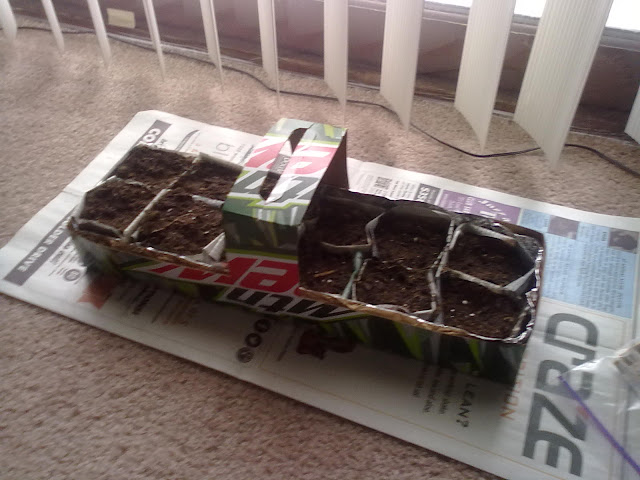
Make a Mountain Dew Planter!

I had seen people start little plants with newspaper squares so you can replant them later, so I started some!


I planted some green beans, cilantro, chives, and basil! 

After 2 weeks of water, sunlight, and tender loving care.. 


Wah Lah!

Excited to transplant them after the snow leaves my porch!

Construction time: 30 minutes
Construction cost: $5 for seeds and soil!

(Happy birthday babah! This was part of the elaborate decorate-the-porch-for-my-husbands-birthday present!)

Make Superhero Bibs!

I thought our baby needed superhero bibs!


Superman, Spiderman, and Buzz Lightyear! They were simple to make. Just Puffy Paint and bibs from Walmart! (~$6) The caption on the Superman Bib is "Who put my cape on backwards?"


Construction time: 1 hour
Construction Cost: $6

Make a Frame for Ultrasound Pictures!

I ended up making this after seeing a few other ideas out there. We had all of these amazing ultrasound pictures and I was worried we'd never have anything to do with them!


I ended up giving this to my husband for Father's Day before our little guy was born! 

Instructions: I found the frame with the 3 matted areas for a few dollars at Michael's. Can't get to the store? There's links to everything you need right here...

Frame:


The words are white puffy paint on the matte. (Let those dry before assembling):


(Click around to get more if you need it)

Then I got a sheet of blue striped scrapbook paper and cut out the ultrasound shape!


Then, place those and the pictures with tape and that's it! VERY easy and a great way to keep the memories! There's a little note for my husband on the back with the date too.

Construction Time: 1 hr

Make my dream bag!

I have had this bag for a while and have, over the past few years, added dozens of little logos and pictures of  things that are my favorites! From sports teams to tv shows to Our Lady of Guadalupe! I have some pictures!


I bought the bag (Original bag logo was a peace sign or something?) from Walmart for a few bucks and otherwise it's pretty much just the cost of puffy paint and google images!

Construction Time: several hours (mostly due to drying)
Total Cost: $5 or less

Wednesday, April 3, 2013

Make a Pet Bed!

I had always wanted to do this, make an overly extravagant bed for our cats! I ended up giving it to my mom for a Christmas present last year!


It's made from an upside-down end table I found on craigslist ($10). That was painted white and  the cushion is just stuffed yellow fleece! Then leftover fabric and yarn for the drapes!

Total Time of Construction: 2 hours
Total Cost: around $12

Definitely recreate able! Just find an end table and get to work!